- 79 Station Ln, Hornchurch, RM12 6JU
- 01708 607930
- info@charismabeautylounge.co.uk
Have you ever wondered how celebrities achieve that flawless, radiant glow? Dermaplaning might just be their secret weapon! This non-invasive skin care treatment, performed by professionals, promises smoother skin and a luminous complexion.
Dermaplaning is a physical exfoliation technique in which a trained professional uses a sterile surgical scalpel to gently scrape off dead skin cells and vellus hair (peach fuzz) from the face.
This process reveals a smoother, brighter complexion underneath. Unlike harsh chemical peels, dermaplaning is a gentle yet effective treatment, making it a go-to option for instant skin rejuvenation.
Professionals bring expertise that DIY kits can’t match. Trusting a skilled practitioner ensures a safe and effective experience.
Dermaplaning is a versatile treatment suitable for most skin types, particularly those seeking a polished and radiant appearance. It’s ideal for anyone wanting to improve skin texture, reduce fine lines, or enhance product absorption. For best results and to maintain smooth skin post-treatment, following proper Aftercare Tips is essential.
If you struggle with dullness, uneven tone, or light acne scarring, dermaplaning can work wonders. It’s also a great prep for special events, as it creates a flawless makeup canvas.
Always discuss your skin history with your dermatologist or other healthcare professional. They’ll determine if dermaplaning is right for you.
Preparation is key to a successful dermaplaning session. Your esthetician will provide specific instructions, but a few universal tips ensure your skin is ready.
Avoid aggressive treatments beforehand to prevent sensitivity. Arrive with a clean face, free of heavy makeup or products, to streamline the process.
Following these steps sets the stage for a seamless experience. Your skin will thank you for the extra care!
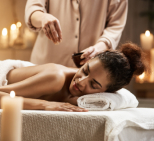
A professional dermaplaning session is a relaxing, methodical process. Each step is designed to maximize results while keeping your skin safe and comfortable.
Here’s what you can expect during your 45–60-minute appointment. Let’s walk through the journey to radiant skin!
Your session begins with a chat. The esthetician inquires about your skincare routine, goals, and any concerns you may have.
They’ll examine your skin under a magnifying lamp to check for active acne, sensitivity, or other issues. This assessment ensures the treatment is tailored to your unique needs.
Next, your face is thoroughly cleansed. A gentle cleanser removes makeup, oil, and impurities to create a clean canvas.
Some professionals may double-cleanse to ensure no residue remains. This step feels refreshing and preps your skin for the blade.
An antiseptic or degreasing solution is applied to disinfect the skin. This step reduces the risk of infection and removes excess oil, resulting in smoother blade strokes.
Your esthetician may also dry the skin to ensure the scalpel glides effortlessly. You’ll feel a slight tingle, but it’s quick and painless.
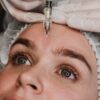
Now, the magic happens! Using a sterile, single-use scalpel held at a 45-degree angle, the esthetician gently scrapes your skin in short, feather-like strokes.
The process is painless—many clients describe it as a light scratching sensation. The professional targets key areas while avoiding sensitive spots, such as the eyelids.
The entire face takes 20–30 minutes, depending on the areas treated. You’ll hear a soft scraping sound as dead skin and hair are removed.
After dermaplaning, your skin is primed to absorb products more effectively. The esthetician applies a hydrating serum, like hyaluronic acid, to lock in moisture.
A soothing moisturizer follows, calming the skin. Finally, a broad-spectrum SPF (30 or higher) is applied to protect your freshly exfoliated face.
Right after dermaplaning, your skin will feel baby-smooth and look radiant. You’ll notice a brighter complexion and a dewy glow that’s hard to miss.
Makeup glides on effortlessly, and your skincare products penetrate deeper. It’s like hitting the reset button for your face!
If redness persists for more than a day, contact your esthetician. This is rare but worth monitoring.
Proper aftercare maximises the benefits of derma planing, keeping your skin looking radiant. Your esthetician will provide personalised advice, but these tips are generally applicable.
Avoid harsh products or sun exposure for a few days. Embrace gentle skincare to nurture your fresh complexion.
Follow these tips for 7–10 days post-treatment. Your skin will stay smooth and radiant longer!
The frequency of dermaplaning depends on your skin type and goals. Most professionals recommend sessions every 3–4 weeks to maintain results.
If you have sensitive skin, spacing treatments 6–8 weeks apart may be better. Always consult your esthetician for a personalized plan.
Overdoing dermaplaning can lead to irritation, so balance is key. Your professional will guide you on the ideal schedule.
Dermaplaning is a game-changer for anyone craving smooth, glowing skin. From the initial consultation to post-treatment care, every step is carefully designed to ensure safety and optimal results.
With minimal downtime and instant radiance, it’s no wonder dermaplaning is a skincare staple. Ready to book your session and experience the glow for yourself?
So, what are you waiting for? Find a licensed professional near you and unlock your skin’s true potential. Your radiant complexion is just one session away!
Recent Posts


WhatsApp us