- 79 Station Ln, Hornchurch, RM12 6JU
- 01708 607930
- info@charismabeautylounge.co.uk
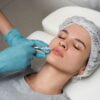
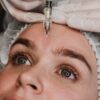
Semi-permanent makeup, also known as cosmetic tattooing or micropigmentation, has become a popular choice for those seeking long-lasting beauty solutions. Whether it’s perfectly shaped eyebrows through microblading, defined eyeliner, vibrant lip blush, or even eyebrow tinting for enhanced color, these treatments can beautifully enhance your features and save time on your daily beauty routine. However, the success of your semi-permanent makeup depends heavily on proper aftercare. Without diligent care, you risk complications like infections, uneven healing, or faded pigments, which can compromise the stunning results you’re aiming for.
Aftercare for semi-permanent makeup isn’t just about following a list of dos and don’ts—it’s about understanding how your skin heals and how to support that process. Each treatment area (eyebrows, eyeliner, or lips) has unique needs, and the healing journey can vary based on your skin type, lifestyle, and the specific technique used.
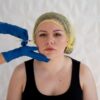
Undergoing a semi-permanent makeup procedure is exciting, but the immediate aftermath can feel overwhelming if you’re not prepared. Right after your appointment, the treated area will likely look more intense than the final result, and you may experience some discomfort or sensitivity. Understanding what’s normal during this initial phase can help you stay calm and ensure you’re taking the right steps to promote healing.
Your technician will provide specific instructions tailored to your treatment, but there are universal expectations for all semi-permanent makeup procedures. The first few days are critical for setting the foundation for beautiful, long-lasting results. Let’s break down the key aspects of what you’ll notice immediately after your procedure and how to navigate the healing process.
It’s completely normal for the treated area to appear red, swollen, or slightly tender right after your semi-permanent makeup procedure. The skin has been through a controlled trauma from the needle depositing pigment, so some inflammation is expected. For example, eyebrows may look darker and bolder than anticipated, while lips might appear overly vibrant or even patchy at first. This is due to the fresh pigment sitting on the skin’s surface and the body’s natural response to the procedure.
As the skin begins to heal, the initial intensity of the colour will soften, typically within a few days. Swelling should subside within 24–48 hours, though it may last slightly longer for lip treatments. Applying a cold pack (wrapped in a clean cloth) can help reduce swelling, but avoid direct ice contact to prevent irritation. If redness or swelling persists beyond a few days or worsens, it’s wise to consult your technician or a medical professional.
The healing process for semi-permanent makeup unfolds in stages, with the most noticeable changes occurring in the first two weeks. During days 1–3, the treated area may feel tender, and the pigment will appear darker than the final result. By days 4–7, you’ll likely notice some flaking or peeling as the skin sheds its outer layer. This is a normal part of the process, and the colour will start to soften. By the end of week two, most of the peeling should be complete, but the pigment may still look uneven.
Full recovery typically takes 4–6 weeks, as the skin continues to regenerate and the pigment settles into its final shade. During this time, the colour may appear lighter or slightly faded before stabilising. Factors like your skin type (oily skin may fade faster) and adherence to aftercare instructions can influence the timeline. Patience is key—avoid rushing to judge the final result until the healing process is complete.
Understanding the difference between normal side effects and potential complications is crucial for a smooth recovery. Normal side effects include mild redness, swelling, tenderness, and slight itching as the skin heals. You may also notice some dryness or flaking, especially around days 4–7. These are all signs that your skin is repairing itself and integrating the pigment.
However, certain symptoms warrant immediate attention. Watch out for:
Proper aftercare is the cornerstone of achieving beautiful, long-lasting semi-permanent makeup results. While specific instructions vary depending on the treatment area, there are general guidelines that apply to all procedures. These rules are designed to protect the treated area, promote healing, and ensure the pigment settles evenly.
Following these guidelines requires diligence, but the effort is worth it to avoid complications like infections or premature fading. Most aftercare steps are simple but must be followed consistently for at least the first 10–14 days. Below are the key practices to incorporate into your routine.
Ease Swelling With a Cold Pack
Do Not Pick, Peel or Scratch
Avoid Sun Exposure
Keep The Treatment Area Dry
Avoid Heavy Exercise
Sleep On A Clean Pillowcase
Avoid Cosmetic Products
Pin Back Your Hair
Limit Hot Showers and Baths
While general aftercare guidelines apply to all semi-permanent makeup treatments, each area—eyebrows, eyeliner, and lips—has unique needs. The skin in these areas differs in thickness, sensitivity, and exposure to environmental factors, so tailored care is essential.
By following these targeted instructions, you can ensure optimal results for your specific treatment. Always consult your technician for personalised advice, as techniques and pigments may vary.
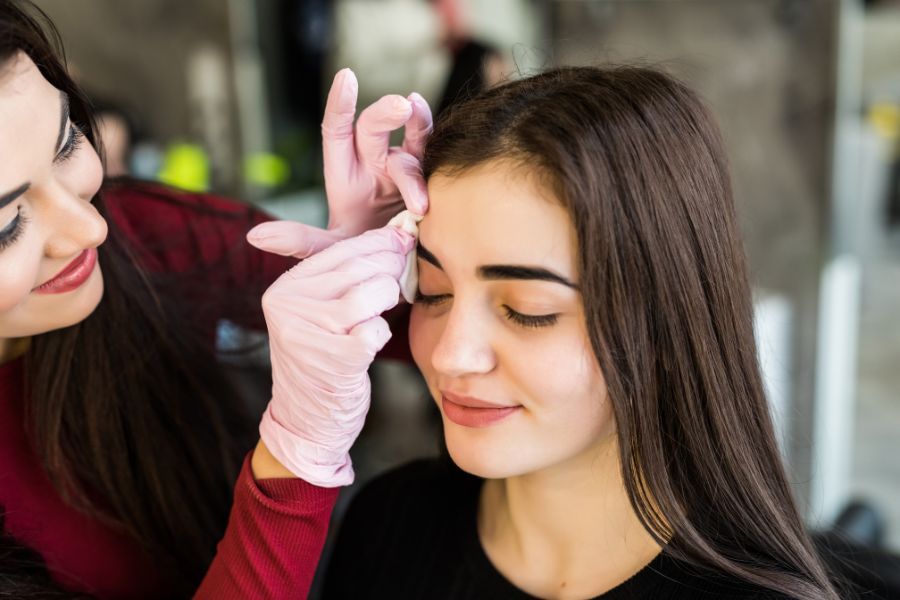
Eyebrow treatments, such as microblading or powder brows, require careful aftercare to achieve the desired shape and colour. Immediately after the procedure, your brows may appear darker and more defined than expected, and the area may feel tender or slightly swollen. Clean the area gently with a damp cotton pad and apply a thin layer of aftercare ointment as directed by your technician, typically 2–3 times daily.
Avoid touching the brows with unwashed hands, and keep them dry for the first 7–10 days. If you wear makeup, avoid applying foundation, powder, or brow products near the treated area. Following these steps diligently will help the pigment settle evenly and prevent patchiness during healing.
The healing process for semi-permanent eyebrows typically follows a predictable pattern:
During these stages, resist the urge to pick at flaking skin, as this can cause uneven pigment loss. Keep the area clean and moisturised to support smooth healing.
Eyeliner treatments are particularly sensitive due to the delicate skin around the eyes. After the procedure, you may experience swelling, redness, or a tight feeling in the area. Gently clean the eyelids with a damp cotton pad and apply a thin layer of aftercare ointment as recommended. Avoid rubbing the eyes or applying mascara, eyeshadow, or eyeliner for at least two weeks.
Protect your eyes from water, sweat, and sunlight, as these can irritate the healing skin or cause the pigment to fade. If you wear contact lenses, consult your technician about when it’s safe to resume wearing them, as they may irritate the area during healing.
The healing process for semi-permanent eyeliner follows a similar timeline to eyebrows:
Be extra cautious with this delicate area, and avoid any activities that could introduce bacteria, such as swimming or using old makeup brushes.
Lip blush treatments enhance the colour and shape of your lips, but the healing process can be more noticeable due to the lips ‘ sensitivity and constant use. Immediately after the procedure, your lips may feel swollen, tender, or dry, and the colour will appear much brighter than the final result. Apply a thin layer of aftercare ointment frequently to keep the lips hydrated and prevent cracking.
Avoid spicy or acidic foods, as they can irritate the lips, and use a straw for drinking to minimise moisture exposure. Refrain from kissing or licking your lips, as this can introduce bacteria and disrupt healing. Keeping the lips clean and protected is key to vibrant, even results.
The healing process for lip blush follows these stages:
Moisturising regularly and avoiding irritants like lip gloss or lipsticks during healing will help achieve the best results.
To protect your semi-permanent makeup and ensure optimal healing, certain activities and products must be avoided during the recovery period. These precautions prevent irritation, infection, or premature fading of the pigment. Being mindful of what to steer clear of is just as important as following the recommended aftercare steps.
Ignoring these restrictions can lead to complications or disappointing results, so take them seriously for at least the first two weeks. Below are the key things to avoid during the healing process.
Touching or scratching the treated area can introduce bacteria, disrupt the pigment, or cause scarring. Your hands carry germs that can lead to infections, especially in the early stages when the skin is still open and vulnerable. If you need to touch the area (e.g., to apply ointment), wash your hands thoroughly first.
If itching occurs, gently pat the area with clean fingertips instead of scratching. Keeping the area moisturised with the recommended aftercare product can also reduce discomfort and prevent the urge to touch or scratch.
Saunas, pools, and gyms pose multiple risks during the healing process. The heat and humidity in saunas can soften the skin and cause pigment loss, while pools and hot tubs may harbour bacteria that can lead to infections. Gyms, with their sweaty environments, increase the risk of contamination and irritation from perspiration.
Avoid these environments for at least 10–14 days post-procedure. If you must exercise, stick to low-impact activities like walking, and ensure the treated area stays clean and dry afterwards.
Certain skincare products can wreak havoc on healing semi-permanent makeup. Avoid products containing:
Stick to gentle, fragrance-free cleansers and the aftercare ointment provided by your technician. Reintroduce active skincare products only after the area is fully healed (typically 4–6 weeks).
The healing duration for semi-permanent makeup varies depending on the treatment area and individual factors like skin type and aftercare adherence. Understanding the healing timeline and when to schedule a touch-up is essential for achieving the best results. Each treatment area has a unique healing process, and touch-ups can refine the final look.
By following your aftercare instructions and timing your touch-up appointment correctly, you can ensure your semi-permanent makeup looks flawless and lasts as long as possible.
Eyebrows typically heal the fastest, with most of the visible healing (flaking and peeling) complete within 7–10 days. The thicker skin in this area allows for quicker recovery, though full pigment stabilisation still takes 4–6 weeks. Eyeliner follows a similar timeline, but the delicate skin around the eyes may require extra care to avoid irritation.
Lip blush tends to take the longest to heal due to the lips, sensitive skin and constant exposure to moisture and movement. Swelling and peeling may persist for up to two weeks, with full recovery taking 4–6 weeks. Oily skin types may experience slightly faster fading across all treatments, requiring earlier touch-ups.
The healing process involves distinct stages that affect the appearance of your semi-permanent makeup:
Avoid interfering with these stages by picking or over-moisturising, as this can disrupt the pigment’s integration into the skin.
A touch-up appointment is often necessary to perfect the results of your semi-permanent makeup. Most technicians recommend scheduling a touch-up 6–8 weeks after the initial procedure, once the skin has fully healed. This allows the technician to assess how the pigment has settled and make any necessary adjustments, such as filling in patchy areas or refining the shape.
If you notice significant pigment loss or uneven healing before the 6-week mark, contact your technician for advice. Avoid scheduling a touch-up too early, as the skin needs time to complete its healing cycle for the best results.
Even with the best intentions, certain mistakes can sabotage your semi-permanent makeup results. These errors can lead to uneven pigment, infections, or premature fading, so it’s crucial to avoid them. Being aware of these pitfalls will help you stay on track during the healing process.
Most mistakes stem from ignoring aftercare instructions or trying to rush the healing process. Below are the most common errors and how to steer clear of them.
DIY remedies, such as applying coconut oil, aloe vera, or other home treatments, can interfere with the healing process. These products may seem harmless, but they can clog pores, introduce bacteria, or disrupt pigment retention. Stick to the aftercare ointment or products recommended by your technician, as these are specifically formulated for semi-permanent makeup.
If you’re unsure about a product or remedy, consult your technician before using it. Using unapproved products can lead to irritation, uneven healing, or disappointing results.
Skipping or ignoring aftercare instructions is one of the fastest ways to ruin your semi-permanent makeup. Each step—whether it’s keeping the area dry, avoiding sun exposure, or applying ointment—is designed to protect the treated area and ensure optimal pigment retention. Even small lapses, like forgetting to avoid makeup or exercising too soon, can have a big impact.
Create a daily checklist to stay on track with your aftercare routine. Consistency is key to achieving the vibrant, even results you want.
Infections or allergic reactions, though rare, can occur if aftercare isn’t followed properly. Signs like excessive swelling, redness, pus, or persistent pain should never be ignored, as they could indicate a serious issue. Allergic reactions to pigments or aftercare products may cause itching, rash, or prolonged discomfort.
If you suspect an infection or allergic reaction, contact your technician or a healthcare provider immediately. Prompt action can prevent complications and protect your results.
While most semi-permanent makeup procedures heal smoothly, certain situations require professional attention. Knowing when to reach out to your technician can prevent minor issues from becoming major problems. Staying proactive and communicative ensures your results stay on track.
Your technician is your best resource for addressing concerns during the healing process. Below are the key signs that warrant a call or visit.
Mild swelling and redness are normal for the first 1–2 days, but if these symptoms worsen or persist beyond 48 hours, it could indicate an issue. Discharge, especially if it’s yellow or green, is a red flag for infection. These symptoms require immediate attention to prevent complications.
Contact your technician as soon as possible, and be prepared to describe the symptoms in detail. They may recommend seeing a doctor or adjusting your aftercare routine to address the issue.
Some discomfort is expected during the first few days, but persistent pain, burning, or itching could signal an allergic reaction to the pigment or aftercare products. Other signs of an allergic reaction include a rash, excessive dryness, or unusual sensitivity in the treated area.
If these symptoms occur, stop using any aftercare products and contact your technician. They may suggest an alternative product or refer you to a dermatologist for further evaluation.
Uneven healing or significant pigment loss can occur if aftercare instructions aren’t followed or if your skin type affects pigment retention. If you notice patchy areas, significant fading, or asymmetry before the 6-week mark, don’t panic—it may be correctable during a touch-up. However, it’s worth discussing with your technician to rule out underlying issues.
Reach out to your technician to schedule a consultation. They can assess the area and recommend whether to wait for the touch-up or take immediate action.
Proper aftercare is the key to achieving stunning, long-lasting semi-permanent makeup results. By understanding what to expect, following general and treatment-specific guidelines, and avoiding common mistakes, you can ensure your brows, eyeliner, or lips heal beautifully. The healing process requires patience and diligence, but the payoff is worth it—a low-maintenance, enhanced look that boosts your confidence.
If you have any concerns or questions during the healing process, don’t hesitate to contact your technician. With the right care and attention, your semi-permanent makeup will look vibrant and flawless for months to come.
Recent Posts


WhatsApp us